The Engulfing candlestick pattern is one of the most powerful and frequently observed two-candle reversal setups in technical analysis. Unlike patterns that signify hesitation or volatility contraction, the Engulfing pattern represents a violent, decisive shift in market sentiment. It occurs when a single candle completely overwhelms the price action of the preceding session, signaling that one side of the market has been entirely routed by the other.
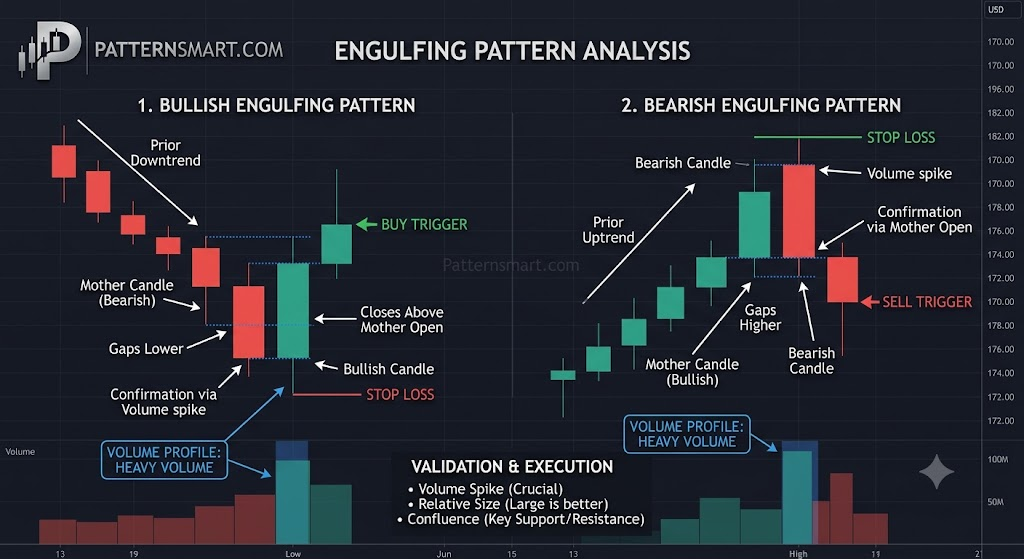
Anatomy of the Engulfing Pattern
The structural definition of an Engulfing pattern requires that the real body of the second candle completely covers (engulfs) the real body of the first candle. While some strict interpretations require the wicks to be engulfed as well, traditional technical analysis focuses primarily on the opening and closing prices (the real bodies).
1. The Bullish Engulfing Pattern
- Prior Trend: Must occur within a defined downtrend or a significant corrective pullback.
- Candle 1: A small bearish (red/black) candle that reflects the final, exhausting push of the prevailing trend.
- Candle 2: A large bullish (green/white) candle. It typically opens lower than the close of Candle 1 (ideally gapping down) but experiences aggressive buying pressure throughout the session, forcing price to close well above the opening price of Candle 1.
- Market Psychology: Bearish momentum appears intact at the open of the second session. However, institutional buyers step in at undervalued levels, driving a massive short-covering rally and a surge of new long positions. The bulls don’t just reject the lower prices; they completely reclaim the territory lost during the previous session.
2. The Bearish Engulfing Pattern
- Prior Trend: Must occur within a defined uptrend or a significant rally within a larger bear market.
- Candle 1: A small bullish candlestick showing that the buyers are maintaining control but losing upward velocity.
- Candle 2: A large bearish candlestick. It often opens higher than the close of Candle 1, but sellers immediately seize control. Price plummets throughout the session, closing below the opening price of the first candle.
- Market Psychology: Optimism at the open quickly turns into trapped inventory. Buyers who went long at the highs are immediately put underwater as aggressive distribution takes place. The sheer size of the second candle demonstrates that supply has completely overwhelmed demand.
Volume Profile and Validation
An Engulfing pattern on its own can occasionally be a trap, especially in choppy, sideways markets. To separate high-probability reversals from temporary market noise, look for specific secondary confirmations:
- The Volume Spike: The second candle (the engulfing candle) must print on substantially higher volume than the first candle, and ideally higher than the moving average volume of the preceding 10 sessions. High volume confirms institutional participation and true accumulation or distribution.
- Relative Size: The larger the engulfing candle is relative to the first candle, the more significant the reversal potential. An engulfing candle that swallows the bodies of the last three or four candles simultaneously carries immensely higher predictive weight.
- Confluence with Key Levels: An Engulfing pattern carries the most weight when the second candle reacts directly off a major horizontal support/resistance level, a key moving average (like the 50-day or 200-day EMA), or an extreme reading on a momentum oscillator.
Execution Strategies
Trading an Engulfing pattern requires a balance between securing a favorable risk-to-reward ratio and avoiding false breakouts.
                  BEARISH ENGULFING TRADING FRAMEWORK

      [Candle 1: Bullish]      [Candle 2: Bearish (Engulfing)]
             +-+                       +---------------+  <- STOP LOSS
             | |                       |               |     (Just above High)
          +--+--+                      |               |
          |  |  |                      |               |
          |  |  |                      |               |
          +--+--+                      |               |
             | |                       |               |
             +-+                       +---------------+  <- TRIGGER
                                               |             (Break of Low)
                                               v
1. Entry Techniques
- The Aggressive Close Entry: Enter the trade immediately prior to the session close of Candle 2, provided it is clear the body will fully engulf Candle 1 on heavy volume.
- The Conservative Breakout Entry: Enter on the next session only if the price breaks below the low (for bearish) or above the high (for bullish) of the engulfing candle. This confirms immediate follow-through.
2. Risk Management
- Stop-Loss Placement: For a Bullish Engulfing pattern, place the stop-loss slightly below the low of the engulfing candle (Candle 2). For a Bearish Engulfing pattern, place the stop-loss slightly whistling above the high of the engulfing candle. If a market retraces past the extreme of an engulfing candle, the reversal thesis is entirely invalidated.
- Profit Targets: Targets should be set at the next major structural pivot point or liquidity pool (e.g., the next significant swing high or low). Due to the wider stop-loss required by a large engulfing candle, ensure the distance to your target satisfies at least a 1:2 risk-to-reward ratio.
Common Trading Pitfalls
- Ignoring Market Context: Forcing an Engulfing pattern into a low-liquidity, range-bound market will result in frequent whipsaws. The pattern relies on a preceding trend to reverse; without a clear trend, it loses its structural meaning.
- Chasing Overextended Candles: Occasionally, the engulfing candle is catastrophically large due to a sudden news event or panic. If the candle is so long that your required stop-loss ruins your risk-to-reward ratio, pass on the trade. Let the market retest or look for a secondary entry pattern.
Please check our Bearish and Bullish Patterns Indicator collection.