The Kicking candlestick pattern is one of the most reliable and aggressively directional two-candle formations in technical analysis. It represents a sudden, violent shift in market sentiment that completely blindsides traders positioned on the wrong side of the trend.
Characterized by two opposing Marubozu candles separated by a price gap, the Kicking pattern is the ultimate visual definition of a structural “shock” to supply and demand.
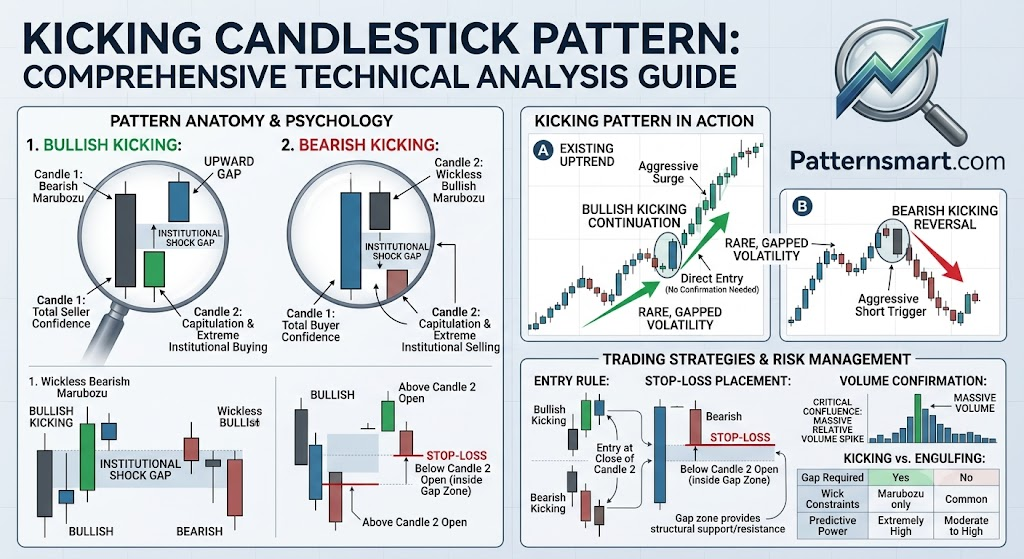
Anatomy of the Kicking Pattern
The Kicking pattern relies on maximum price conviction and occurs in two variations: Bullish and Bearish.
To be classified as a valid Kicking pattern, it must strictly adhere to the following geometric conditions:
The Bullish Kicking
- Candle 1: A pure Bearish Marubozu forms (long red/black body with no upper or lower wicks), showing total seller control.
- The Gap: The next session opens with a sharp price gap upward, clearing past the opening price of Candle 1.
- Candle 2: A pure Bullish Marubozu forms (long green/white body with no wicks), closing well above the gap and holding its gains until the final bell.
The Bearish Kicking
- Candle 1: A pure Bullish Marubozu forms, signaling complete buyer dominance.
- The Gap: The next session opens with a massive price gap downward, plunging below the opening price of Candle 1.
- Candle 2: A pure Bearish Marubozu forms, driving prices lower throughout the session and closing at its absolute bottom.
Note on Wicks: While textbook definitions require pure Marubozu candles, real-world variations may allow exceptionally minor “stumpy” shadows. However, the presence of long wicks completely invalidates the pattern, as they indicate intra-session hesitation.
The Market Psychology: Total Regime Shift
The narrative behind a Kicking pattern is driven by high-impact external catalysts—such as unexpected earnings surprises, macroeconomic policy changes, or geopolitical events—that occur while the market is closed.
- The Setup (Candle 1): The market behaves with absolute uniformity. One side is completely confident, creating a massive candle of conviction.
- The Shock (The Gap): Over the market pause, a piece of fundamental news hits. The psychological reality changes instantly. When the market reopens, the asset is priced drastically higher or lower.
- The Capitulation (Candle 2): Trapped traders are forced to liquidate their positions immediately. This forced capitulation, combined with fresh institutional capital piling into the new direction, creates an unyielding trend that doesn’t allow for a single retracement or shadow during the entire session.
Strategic Trading Applications
Because the Kicking pattern demonstrates such severe institutional force, it is heavily backtested as a high-probability trigger. Unlike many other patterns, the Kicking pattern does not require waiting for a subsequent confirmation candle.
1. The Entry Execution
- Bullish Kicking Entry: Enter long immediately at the close of Candle 2 (the Bullish Marubozu). The sheer volume and momentum of the gap ensure a very low probability of a false breakout.
- Bearish Kicking Entry: Enter a short position exactly at the close of Candle 2 (the Bearish Marubozu).
2. Risk Management (Stop-Loss Placement)
The structural gap creates an incredibly clean line for protecting capital:
- Long Positions: Place your stop-loss just below the opening price of Candle 2 (the bottom of the green Marubozu) or inside the gap zone. If the market retraces enough to fill that gap, the momentum has stalled.
- Short Positions: Place your stop-loss just above the opening price of Candle 2 (the top of the red Marubozu).
3. Volume and Technical Confluence
- The Volume Spike: Candle 2 must be accompanied by a massive surge in relative volume. Low volume on a Kicking pattern suggests a lack of institutional backing, raising the risk of a “dead cat bounce.”
- The Support/Resistance Interaction: If a Bullish Kicking pattern gaps over a multi-month ceiling of structural resistance, that old resistance instantly transforms into an incredibly strong floor of support for future retests.
Kicking Pattern vs. Engulfing Pattern
While both patterns feature opposing candle colors, their mechanics differ substantially:
| Feature | Kicking Pattern | Engulfing Pattern |
| Separation Mechanic | Requires a physical price gap between Candle 1 and 2. | Candle 2 opens within or past Candle 1’s body and wraps it. |
| Wick Constraints | Must be Marubozu candles (virtually no wicks). | Wicks are highly common and expected on both candles. |
| Catalyst Dependency | Almost always driven by high-impact overnight news. | Driven by standard intra-day momentum shifts. |
| Predictive Power | Extremely High; rarely requires confirmation. | Moderate to High; usually requires a confirmation candle. |
The Kicking pattern is relatively rare on modern charts due to its strict structural requirements, but when it surfaces, it is one of the clearest signals that a powerful new market trend has just been born.
Please check our Bearish and Bullish Patterns Indicator collection.