Breakout Retests Explained: How to Distinguish Acceptance from a False Breakout
A close beyond resistance is evidence that price has crossed a reference level—not proof that the market will continue in that direction. The distinction matters because a breakout can attract momentum buyers just before price reverses back into its former range. A retest provides a second observation: does the former resistance behave as support, or does the market reject the breakout?
1. Define the level before the breakout
Resistance is best treated as a zone rather than an infinitely precise line. It may be established by repeated swing highs, a prior consolidation ceiling, or an area where advances repeatedly stalled. A level selected only after a profitable move is vulnerable to hindsight bias. Mark the zone using information available before the prospective signal and keep the chart timeframe consistent.
For a bullish breakout, the sequence is: price trades below resistance; a completed candle closes above the preidentified zone; price revisits or approaches the zone; and buyers demonstrate acceptance above it. A bearish breakdown follows the mirror image around support. Retests are not guaranteed to occur, and a shallow pullback is not automatically a retest.
2. What acceptance and failure look like
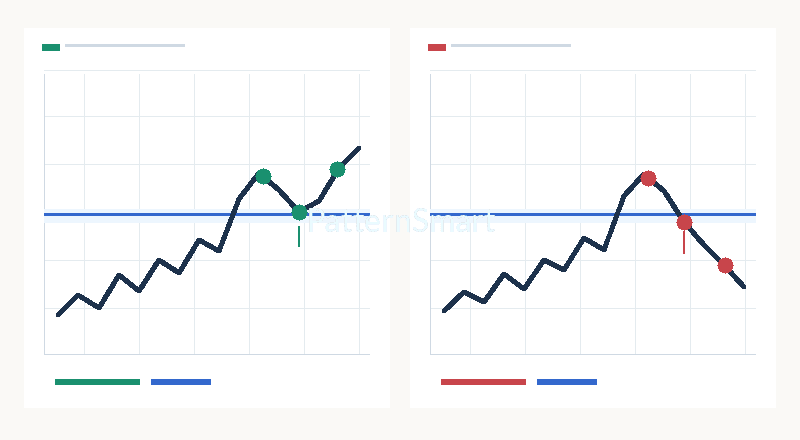
Acceptance: after a breakout, several closes remain above the former resistance, a pullback fails to establish sustained trading beneath it, and the market begins making higher swing lows or renewed highs. Failure: the breakout quickly loses the level, price closes back inside the old range, and subsequent attempts to reclaim resistance stall. One wick below a zone is not, by itself, proof of failure; likewise, one bounce does not prove acceptance.
3. A repeatable confirmation checklist
- Predefine the zone: identify the consolidation ceiling and its width before a breakout occurs.
- Require a completed close: avoid treating a temporary intrabar spike as a confirmed breakout.
- Observe the retest: distinguish a controlled pullback from a fast reversal that immediately erases the breakout.
- Evaluate structure: watch whether price holds above the zone and establishes a higher low, or instead closes decisively back below it.
- Consider context: a higher-timeframe downtrend, thin liquidity or a nearby supply area can undermine a seemingly attractive bullish breakout.
- Define invalidation: specify what would disprove the setup before considering any entry.
4. Worked example with hypothetical prices
Assume a market has repeatedly stalled between 99.80 and 100.20. The trader marks that band as resistance before the next session. Price then closes at 100.80, pulls back to 100.25, and subsequently closes at 101.10. This is consistent with a potential successful retest because the pullback remained near or above the prior zone and the next close recovered upward momentum. It is still not a guarantee.
Suppose a planned entry is 101.10, with an invalidation stop at 99.70 beneath the marked zone. The price risk is 1.40 units per share or contract unit. A hypothetical objective at 103.90 is 2.80 units away, implying a 2:1 gross reward-to-risk ratio before spreads, slippage, commissions and any contract multiplier. The ratio describes the proposed trade geometry, not the probability of success.
| Observation | Potential acceptance | Potential false breakout |
|---|---|---|
| Close after crossing the level | Above premarked resistance | Above initially, then back below |
| Retest behavior | Pullback stabilizes near former resistance | Price spends sustained time inside old range |
| Subsequent structure | Higher low and renewed upward progress | Failed reclaim or lower high |
| Interpretation | Conditional evidence of demand | Conditional evidence of rejected breakout |
5. Confirmation is not the same as certainty
Volume may add context when reliable exchange volume exists, but volume alone cannot establish a successful breakout. An ATR-based distance filter can help compare breakout magnitude with recent volatility; however, an unusually large breakout candle can also indicate an extended move and poor entry location. Requiring more closes may reduce some false signals but necessarily increases delay. No fixed confirmation count is optimal for every asset or timeframe.
Common mistakes include moving the resistance zone after the fact, ignoring spread and slippage, entering solely because a wick crossed the level, treating a single retest candle as a guarantee, and placing stops at visually obvious prices without considering volatility and position sizing. Backtests should use completed candles and realistic transaction assumptions; intrabar execution assumptions must be modeled explicitly.
6. Build a measurable research rule
To study the idea, define the resistance zone using a fixed lookback, require a close above its upper boundary, specify a maximum number of bars for the retest, define what counts as holding or reclaiming the zone, and state an invalidation condition. Track breakout frequency, retest frequency, false-breakout rate, average excursion, costs and results across market regimes. These definitions can be implemented and audited through Custom Trading Software Development Services when discretionary descriptions need to become reproducible rules.
Risk disclaimer: This article is for technical education only, not investment advice. The price levels are invented solely to demonstrate arithmetic. Breakout trading can incur rapid losses, gaps and slippage; evaluate suitability and risk independently.